Kick off the summer in style with this easy DIY wicker circle basket bag tutorial.
I have been admiring the many wicker basket bags popping up on the highstreet recently thinking how perfect they are for long summer days at the beach or strolling around your favourite European city. I thought I would show you how to make your own at a fraction of the cost of those on the highstreet as this far eastern inspired trend is sure to be everywhere this summer.

You will need:
Wicker placemats (I got mine from Ebay), the more flexible the better (try these too)
Fabric tote/shopper
Hot Glue Gun and glue (I got mine from Hobby Craft)
Scissors
Sewing Machine (or strong fabric glue)
Pom poms for decoration (optional)
Pencil
Lie your fabric bag out on a table and start by drawing around your place mat to get a template. Be sure to place the mat just above the point where the handles of the bag start, this way when you cut it out you will have included the handles of the bag.
Cut your fabric bag out following the template of the mat.


Next you will need to sew your bag back up. I used a sewing machine but you could always use strong fabric glue or hand sew depending on which you find easiest.
Sew or glue all the way around the bottom of your bag, leaving the top with the handles open.
My top tip here is to stop sewing a few centimeters just before the top of the bag at each side, this gives you a wider gap when opening your bag.


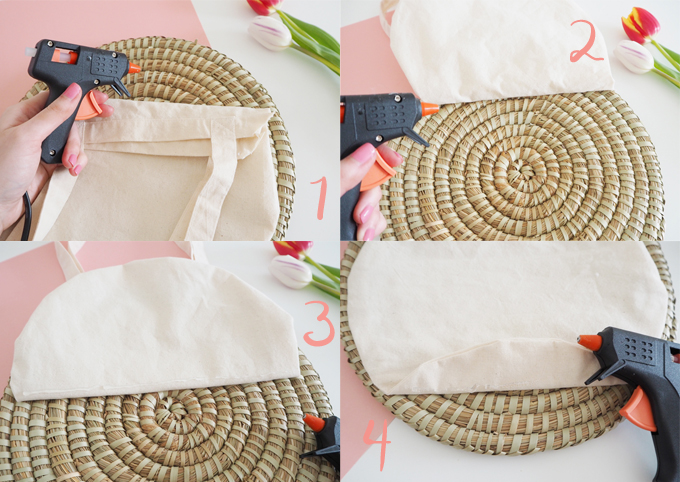
Once you have sewn your bag back up, turn it the right way out so the seam is on the inside. Next it’s time to glue the place mats to either side of your bag.
I started by gluing the top of the bag down first, then working down to the bottom using strips of glue until the first side was fully stuck down. Make sure the glue doesn’t soak through the bag and stick down the other side.


This is the tricky bit.
I found attaching the second place mat a little harder as it’s less flexible after I had stuck one side down already. Try starting from the bottom and cover as much of the bottom with glue as you can before attaching the second mat. Slide your hand inside the bag to help secure the bag whilst the glue dries. Work your way to the top, sliding the glue gun inside as much as you can. Towards the top I found I could only really glue around the sides as my glue gun wouldn’t fit between the bag and basket anymore.
My top tip here is not to glue too close to the side edges of the bag. The more material there is at the sides the more your bag will open and the more you will be able to fit in your bag. Think about working in a U shape when gluing, the bottom can be glued close to edge but leave around 2-5 cm of unglued fabric all the way down the sides.


Once your bag is fully dried, it’s time to decorate in any way you want. I added some fluffy pompoms for a little pop of colour. Use a glue gun or needle and thread to attach as many as your like. You could also try brightly coloured tassels for a morrocan traveller feel.


How easy was that!?
I love the finished result from this DIY. It’s a really easy way to create a unique but stylish accessory this summer. My bag isn’t big inside, but it’s enough to hold the essentials such as my phone, glasses and lip balm, and what more does a girl need?
I got a pack of 6 placemats that were 30cm diameter each, so I think I am going to make some more, feel free to message me if you would like to buy one of these bags, I might even add them to my Etsy store!
I hope you have enjoyed this summer accessory DIY, I would love to hear your thoughts in the comments below.
Anna
x
You might also like:
DIY | Off the Shoulder Top
DIY | Crochet Festival Top